Introduction
Welcome to Scan and Dine — we’re excited to have you with us!
This user guide shows you how to easily create your QR code-based online menu and make it available to your customers. It will help you manage your menu by providing information on creating, editing and rearranging menu items and categories, as well as enabling available features that will make your menu stand out.
Let’s get started!
Choosing how to create your menu
The first time you sign in, you will be asked how you would like to create your menu.

You can either upload photos of an existing printed menu and have Scan and Dine create the menu automatically, or start with one of the available ready-made templates.
Exploring the menu
Before we get down into the details of creating your own menu, let’s actually see what a Scan and Dine menu looks like. The below example shows what a customer will see on their smartphone when scanning the QR code:

Quite fancy, isn’t it?
You’ll start creating such eye-catchy menus in a moment.
The above menu example is what we call the customer menu view. It’s a view that you set up for your customers, choosing what menu items to show, in what color theme, and with what extra options enabled or disabled (for example, Pet friendly badge, labels and allergens indicators, social media channels etc.).
We also have the owner menu view, in which you’ll spend your time setting up and customizing your menu. As an owner, you have access to all available features and options which enable you to define exactly how your menu will be displayed to your customers, including what they can do with it.
Here’s the above menu again — which, by the way, is using the Restaurant template — viewed from the owner’s perspective (that’s you!):

Note that we’re using a computer screen instead of a smartphone to view this menu, that’s why things are spread out a bit, giving more room for managing them. You can easily manage your menu from your smartphone or tablet, too. We just wanted to show that your menu is accessible by any device that has an internet connection.
Just from this view, you already have a good idea how your menu looks like and you can clearly see the basic similarity with the customer menu view. Impressive, right? But things will get even more interesting… so let’s continue.
Menus are separated into three main areas:
- Toolbars
- Menu category titles
- Menu item cards
We’ll go into more details concerning each area in the following sections. To keep things simple, we’ll be covering things from the owner’s perspective, so the screenshots will be from the owner menu view.
💡 Don’t fret, though. The customer menu view will be covered later on in this user guide.
Toolbars
Your menu features two toolbars. The topmost toolbar — with the dark
background — shows your business name (left-hand side) and two action
buttons, the Add item  and
Options & settings
and
Options & settings  buttons (right-hand side).
The second, less discrete toolbar, is just below the first one and contains two active spots: the Categories drop-down menu (left-hand side) and the Go to top arrow (right-hand side).
Here’s how they look:

Further down in this user guide you’ll find more information regarding the action buttons and the active spots of the toolbars.
Menu category titles
Menus need categories to keep things neat and tidy. They also provide you and your customers quick and easy access to specific groups of menu items. These category sections are elegantly displayed using their titles throughout the menu, and look like this:

💡 You and your customers can instantly jump to any menu category using the Categories drop-down menu, which we cover here in this user guide.
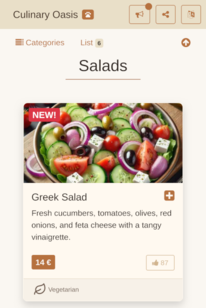
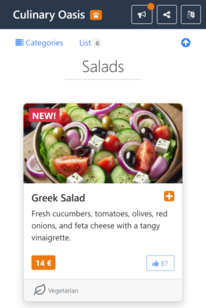
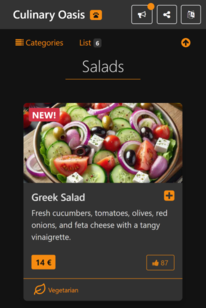
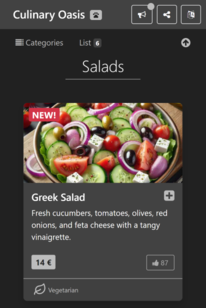
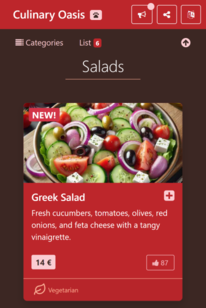
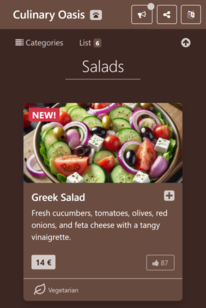
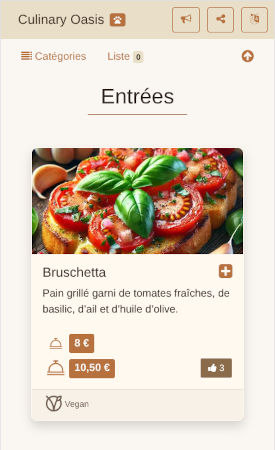
Menu item cards
Menu items are displayed in so-called cards. Here’s an example menu item card from the owner’s perspective:

The owner’s view of menu item cards provides extra information and options such as editing, deactivating, deleting etc. of a menu item. We’ll cover these in detail later on.
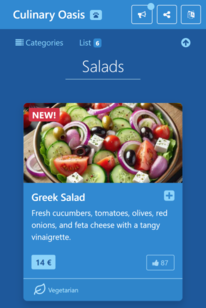
And here’s the same example as a customer will see it:

As you can see, these cards provide a visually catchy way of showing your menu items to customers. At the same time, these cards bring forth all needed information a customer would like to have such as the item’s image, title, description, price, and any labels or allergens of importance.
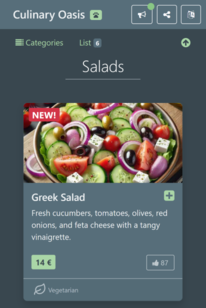
Menu item cards are also interactive. Along with the eye-candy they offer, we wanted to motivate customers to explore them more — make them more playful. That’s why we have visual indicators such as the Like button as well as the List button. These provide a starting point to make customers think along the lines of “What would happen if I select this? Is that part also selectable? — Hmm, let me check…”. This gets them involved and they feel part of the process; it’s not just another static electronic menu for them.
Along this logic, we’ve made the cards’ images and text descriptions selectable. If someone selects a card’s image, they’ll see a full-blown version of it, as shown below:

Likewise, if a customer selects a card’s description they will see its full text — handy when you have long descriptions:

💡 Menu item cards can be without images, too. In some cases, this could be a desired approach. For example, you might not have yet an image to add; or some common menu items usually don’t need an image, such as sauces, dips, condiments etc. Keep in mind, though, that images do catch customers’ attention and bring to life your online menu — so, don’t neglect adding them when possible.


 which is
on the menu item card, below the price tag.
which is
on the menu item card, below the price tag.
 which is next to the
Edit item button.
which is next to the
Edit item button. which
you can find in every menu item card. Once selected, you’ll be presented
with the Delete Confirmation window.
which
you can find in every menu item card. Once selected, you’ll be presented
with the Delete Confirmation window.